I am building a large Arduino-based project and want to incorporate music from the circuit board that I ripped out of a Hallmark card that plays music. This blog entry is a guide to build a simple way to control the Hallmark circuit from the Arduino. In order to build this project you will need the following parts/components:
- Hallmark (or other brand) card that plays music
- Arduino microcontroller (I’m using the Duemilanove)
- RadioShack Reed Relay (part number 275-232)
- Breadboard
- 6 short pieces of insulated wire
- Soldering gun & solder
In case you are not familiar with these musical Hallmark cards or have not torn one apart, inside the card there is a small circuit board containing a battery and a small speaker. On the circuit board, there is a piece of plastic (that acts as a switch) that slides back and forth when you open and close the card. When the card is closed, the plastic is separating the two contacts and therefore not playing music. When the card is opened, the plastic piece allows the two contacts to touch, and results in music playing. All cards are pre-programmed with music and the card I chose has a 25 second clip of “Over the Rainbow”.
This project has two primary goals:
- Power the Hallmark circuit board from the Arduino with +3V so I don’t have to worry about the battery dying
- Use a digital pin on the Arduino (and a reed relay) to control the music
Below are the steps to control the card’s circuit board and play music from the Arduino:
- Carefully tear apart a Hallmark card that plays music and remove the circuit board and speaker. Take care when removing the board and speaker because they are usually glued to the inside of the card.
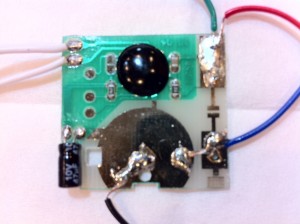
- Remove the battery and carefully tear off the top bracket that holds the battery down. Double check how the battery is inserted into the circuit board and note the positive and negative sides. On my board, the negative side of the battery is pressing down onto the circuit board (negative) and the positive side was facing up and had a connection to the battery bracket (that I just tore off). Once the battery bracket is removed, you will see where it was riveted (positive). Note the positive (red wire) and negative (black wire) locations as you will need to solder a lead to these two locations shortly.
- Locate where a piece of metal is anchored to form a switch when it is allowed to press down. And stops the music from playing when it is raised or separated from the contact below it on the circuit board. The location where the metal switch is connected must be soldered to connect to one side of your reed switch (blue wire). The location where the metal switch makes contact (and results in music being played) to the circuit board is the location where the second end of your reed switch will be soldered (green wire).
- Solder your wires as described above and as displayed below (note the white wires were already soldered for the speaker).
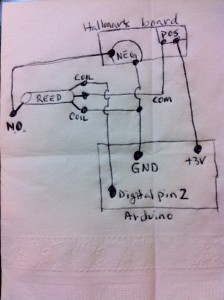
- Wire up the modified board to your Arduino as follows:Red: Connect to the Arduino 3V pin. NOTE: take care to not connect this to the 5V pin as it may damage the Hallmark circuit board.
Black: Connect to any Arduino ground pin.
Blue: Connect to on side of the COM connection on the reed switch (post on end of switch with just 1 pin).
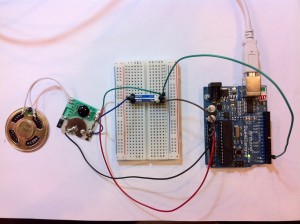
Green: Connect to the N.O. connection on the reed switch (center post on switch on side with 3 pins). Below is the schematic: - Once all connected, it should appear similar to the photo below:
- The final step is to plug your Arduino board into your computer, compile & load the following sketch onto the Arduino and verify everything works as expected.

Hallmark Board Soldered

All Wired Together
Note that I chose 25 seconds for the initial pause because that is approximately the amount of music that is played by the card that I chose. You should experiment to find out the right length for your card. Then customize this program as playing the song over and over in a loop will drive you mad. I’m planning to use this hardware and software technique to play music from a larger Arduino electronics project.

Leave a Reply