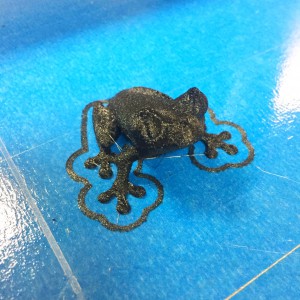
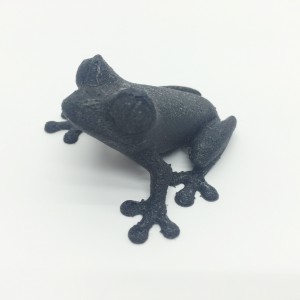
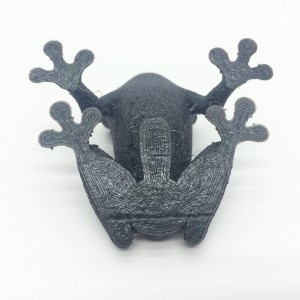
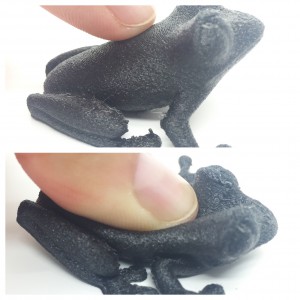
I’ve been experimenting with NinjaFlex filament and wanted to share my experience using it on my Printrbot Plus Metal with a V2 aluminum extruder. I’ve had pretty good success and wanted to share some pictures of my print using NinjaFlex of the Treefrog by MorenaP from Thingiverse:
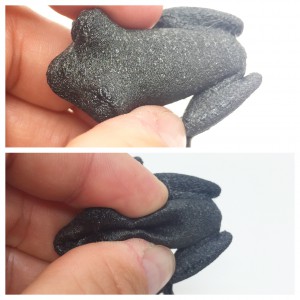
I’d encourage you to try NinjaFlex filament as it is amazing to be able to create objects that are flexible and bendable. The resulting object is also super strong and resistant to tear. NinjaFlex makes this frog almost seem lifelike when you hold it!
Okay, here are the dos and don’t that I’ve discovered to have a good experience with NinjaFlex:
DO modify your extruder to remove the gap in the Printrbot V1 aluminum extruder. You have several options including (search Internet for “NinjaFlex extruder”) filling the gap with Sugru, printing an adapter to remove the extra room in the extruder or upgrading to the V2 Printrbot extruder. I highly recommend upgrading your extruder to the Printrbot V2 aluminum extruder because NinjaFlex is expensive filament, so why mess around wasting time and filament when you could have better success and less hassle with an upgraded extruder. The filament hole in the Printrbot V2 aluminum extruder is much smaller diameter than the Printrbot V1 extruder filament hole. This smaller hole and tighter extruder design does a better job of feeding flexible filament through the direct drive and into the hotend without allowing the filament to get bent like a pretzel.
DON’T Feed too much filament through your extruder too quickly! I made a mistake when I loaded the filament for the fist time and while experimenting, manually extruding NinjaFlex using my CAM software (Simplify3D). Initially it was extruding 10mm at a time without any issue, but as I continued to extrude 10mm over and over without stopping, the extrusion stopped. My extruder stepper motor was not able to turn. Turns out I was feeding filament too quickly through the hotend. Unlike PLA or ABS, you cannot extrude too quickly. So if you want to prime your hotend, for example, you need to be very patient and extrude 10mm, wait for a few seconds then extrude 10 again. If you extrude too much too quickly, you will likely get a kink in your filament. In my case, I had to disassemble my extruder in order to remove the filament that was tangled.
DO prime your extruder if you are switching from a different filament. Always do your priming of NinjaFlex slowly to avoid a jam. I typically run a total of 200mm through my extruder to make sure the previous filament is fully flushed prior to printing with a new filament. With NinjaFlex, you need to manually extrude 10mm and wait a few seconds before extruding again. Priming the extruder is super important if you are switching from a previous filament that is not NinjaFlex. As always, when flushing your hotend, remember that you should be extruding at the highest temperature required by your previous filament or new filament…then adjust to the appropriate temperature for your new filament once flushed.
DON’T have your hotend too hot or you will get a lot of NinjaFlex drool…meaning filament will drip from your nozzle and leave globs on your print. Too hot can also make your filament even more flexible and cause it to jam. And don’t have your hotend too cool or it will not heat your filament quickly enough, which will cause a backup and cause your filament to get jammed in your direct drive gear. 215C seems to work well for me (see more details below).
DO set your CAM software appropriately for NinjaFlex. Here are the key differences I’ve discovered through my experimentation:
- Set hotend to 217C for your first layer at .3mm (I double the first layer height using first layer height of 200% in Simplify3D)
- Set hotend to 215C for subsequent layers at .15mm
- Turn on retraction with retraction distance 1.5mm and retraction speed at 1800mm/minute
- Definitely use a skirt of 3-5 outlines depending on the size of the object. Use fewer outlines for larger objects and more outlines for smaller objects.
- Infill will vary. Less infill makes your object more squishy. 20% infill is a good place to start.
- Some heat on the bed seems to help make NinjaFlex stick, I’ve had great successful at 40C.
- On the bed, I use a bit of hairspray on blue painter’s tape and get good adhesion and easy release after the print finishes
- Turn your fan on for layers 2+. You want the fan to be off for the first layer to get good adhesion.
- Set default printing speed to
900 mm/sec900 mm/minute - Set default X/Y movement speed to any speed you want. I leave mine at the default of
3600 mm/sec3600 mm/minute. You want your nozzle to move very quickly while traveling and not extruding to minimize drool/globs on your object.
DON’T get discouraged if you have some initial failures printing NinjaFlex. Remember to go slowly and don’t push too much filament through your extruder too quickly! And if it gets jammed, no sweat, just let things cool, take the extruder apart and it should be easy to untangle any filament that is jammed.
DO Share your experiences so we can learn from one another!
Hi,
Just wondering…
“Set default printing speed to 900mm/sec” and “Set default X/Y movement…default of 3600mm/sec”
Is that correct? I am trying to get Ninjaflex to print and having a rough time.
Looking to tweak my speed settings and looking for a starting point.
Thanks!
Hi Jose, thanks for your comment! You are correct that I had two typos in my post. The speeds you referenced should have been in millimeters per minute, not millimeters per second. Thanks for catching that typo. I’ve corrected it above.
Here are a few additional thoughts I’d like to share which may or may not be applicable for your issues:
1) In my experience, NinjaFlex is much more finicky to print than most other popular filaments such as PLA or ABS. My primary challenge with NinjaFlex is getting the filament to extrude at the correct rate (not too much or too little filament extruded) with minimal drooling. Too much filament and it can result in globs of excess filament to interfere with the print. Too little filament and there will be gaps in the extruded filament, which causes the print to fail. In contrast, with NinjaFlex, I have not had any issues with adhesion to bed, for example, which can be a huge issue with ABS. And, from my experience, what worked for others did not always work for me using NinjaFlex on my printer.
a) If you have an issue with filament getting tangled in your extruder (early or hours into a print), and you don’t have an extruder designed (or adapted) to print flexible filament, you need to upgrade your extruder. I spend many hours trying to get an older extruders to print using NinjaFlex, but it just doesn’t work reliably!
b) The hot end temp is really important. Too hot and you get a lot of excess drool (filament oozing out and causing stringing) and heat creep can cause the filament to become too warm and flexible and interfere with it being fed (and can cause it to slip or get tangled). Too cold and you will have your extruder stutter or slip as the filament cannot be melted quickly enough. To find your right temperature, I’d recommend the Goldilocks method: Get your extruder a bit hotter than you think you’ll need (say 219 C) and try to extrude. Expect the extrusion to have some excess drool as we this we set the temp too high. Slowly tick down the temp (1 degree at a time) and wait a few minutes and watch to see how it prints. Make sure you give each temperature at least 3-5 minutes to ensure the temperature is adjusted as you view how well it is extruding. When you find the right temperature, it will flow consistently and not have any excess gobs of filament or missing filament in the extruded bead. If you adjust the temperature too low, you will hear your extruder stutter or begin spinning while being unable to push more filament into the hotend.
c) Speed matters. Generally, you will have to print more slowly (at least that is my finding and what I’ve ready works for others) than you print PLA or ABS, but you’ll want to continue to have your non-printing movements be normal (fast) speed to minimize drool. I’ve found that printing speed and hotend temperature are definitely related. If you want to try pushing how fast you can print NinjaFlex, you’ll also need to probably increase your hotend temperature.
d) Extruder tension is important. I’ve found that slightly less pressure on the extruder drive gear worked better than what I use for PLA and ABS. Too much pressure can crush the NinjaFlex and cause it to get deformed or tangled. While printing NinjaFlex, I’ve seen my extruder gear slip a bit here and there (not often). While having the extruder gear slip is not a good thing, but some slippage here and there is better than cramming too much filament into the hotend or having a lot of tension dig away at the filament or cause the filament to get tangled like a pretzel.
2) As you probably already know, TPU (and NinjaFlex in particular), absorbs a lot of moisture over time if not stored properly. This moisture creates gaps in the extruded filament and makes printing difficult. Depending on the age of your filament and how you store it, you may want to research techniques for for drying filament (heating, etc.) to remove the moisture. I have found that NinjaFlex can “go bad” and seems to have issues printing (using the same settings that worked a few months earlier) in just a few weeks after opening (and storing improperly).
3) If you are using a printrbot, they recently released a new gearhead extruder upgrade (https://printrbot.com/shop/gear-head-extruder/). I have purchased and received my gearhead extruder, but have not yet had a chance to install and test it. I will definitely blog about my experiences using this new extruder. I’ve heard good things about this extruder upgrade!
Has anyone had success with a Robo R2 printer and Ninjaflex? I’ve been making micro adjustments here and there but the ninja flex bunches up every time.