I am the 79th backer on Kickstarter for the Structur3D Discov3ry paste 3D printer extruder. I originally saw the extruder at at the MakerFaire in 2014 in San Mateo, CA.
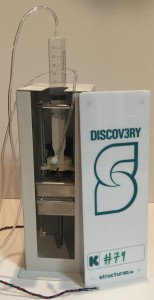
I immediately realized that its ability to print paste materials would greatly expand what I could print and create. I was impressed with its ability to print 3D food as well as print other flexible materials in 3D such as pure silicone, clay, etc. I recently (late May 2015) received my Structur3D Discov3ry paste extruder and my first impressions are that I’m impressed with the overall quality of the final product. The extruder consists of a beefy metal unit that holds a 60cc syringe and, using a stepper motor like those used for filament printers, compresses the syringe to pump paste material to a paste print tip, fundamentally no different than a filament printer that extrudes molten plastic.
Although I have setup my Structur3d Discov3ry extruder, I have not yet printed my first print (will be printing first print next week). I have spent a lot of time configuring/attaching/preparing my paste extruder and want to share my experience so far to help those with Printrbot printers. With this Structur3d Discov3ry paste extruder being so new, we’re all blazing new ground, so I want to share this information quickly to help others with Printrbot printers.
Here are the major tasks to get a Printrbot Metal Plus setup with the Structur3D Discov3ry extruder:
1. Connect paste extruder wiring:
The guys at Structu3D are awesome, and with their help we figured out the wiring for Printrbot printers. However, you first need to decide if you are going to make your machine a dual extruder (one extruder being a paste extruder and one extruder printing filament) or single extruder. In order to go the dual route, you need to make sure your printer’s board/electronics supports dual extruders. Alternately, you can create a single extruder setup where you configure your extruder wiring to allow different extruders to be unplugged and replugged when switching between your filament extruder and paste extruder (my preferred approach). In this approach, both extruders can be physically mounted to your printer, but only one will be plugged into your printer’s board at a time and therefore only one will be active at a time. There is no need to unmount your paste extruder when it is not active if your mount is lightweight and not too bulky and does not get in your way while filament printing.
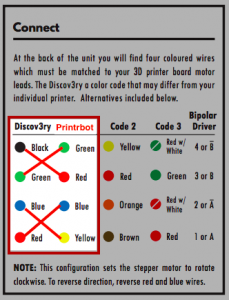
To connect your extruder, see the marked up wiring cheat sheet supplied by Structur3D below. By visual inspection of a new and old Printrbot printer’s stepper motor wires, you will see that Printrbots have the “Code 1” (labeled Printrbot below) wiring color codes, and the appropriate wire connections are indicated below (via red lines) as follows (Discover3y to Printrbot): black to red, green to green, blue to yellow, red to blue:
In the spirit of getting the extruder up and running, more quickly, I just unplugged my filament extruder and plugged the Discov3ry extruder directly to the Printrbot printer board. I bought the OSEPP I2C Bus Cable from Fry’s and soldered the 4 Structur3D Discov3ry stepper motor (extruder) wires to the Fry’s connector. Long-term, I want a female plug mounted on the exterior of my printer that allows my Printrbot filament and Structur3D Discov3ry paste extruders to be connected and disconnected easily without opening up and accessing my printer’s board. Short-term, I have the bottom off my printer and I plug and unplug extruder connection plugs as needed. Obviously, make sure your printer is turned off whenever you are unplugging and plugging plugs into the Printrboard.
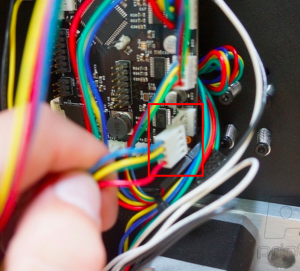
Below is a photo from Printrbot of the extruder motor plug on the Printrboard (it is labeled “EMOT” for Extruder MOTor) on the Printrboard F board (with the plug indicated by the red rectangle):
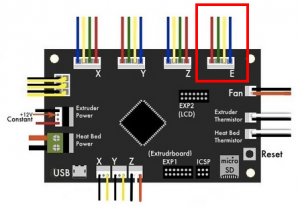
And below is a diagram from Printrbot of the Printrboard, note that the EMOT connector is indicated by the red rectangle and is labeled as “E”. The orientation of the Printrbot stepper motor wires is helpful to make sure you translate properly and plug theStructur3D Discov3ry stepper motor in properly. Keep in mind that stepper motors are pretty forgiving, so plugging in the motor incorrectly will not damage the motor, but it also will not work properly:
2. Print & install your paste tip mount:
The paste extruder has a plastic tip that connects to the end of a flexible plastic tube. In order to print using this extruder, you need to find a way to mount the tips on your printer. I tried, but could not find an existing community-created paste tip mount for the Structur3D Discov3ry paste extruder for any Printrbot printers. I checked the Structur3D Discov3ry forums as well as the usual 3D model sharing sites including thingiverse.com, youmagine.com, myminifactory.com, etc. I didn’t find anything that existed, so I designed my own mount for the Printrbot Metal Plus as well as an adapter that allows it to work properly on the Printrbot Metal Simple. My mount 3D models are available on thingiverse.com.
My design is inspired by the Structur3D Felix 3.0 3D printer’s paste mount (as far as I see in their videos and photos on their site). I took the following into consideration for my design:
- Want mount’s height to be adjustable and use existing screw holes on printer (you will need longer M3 metric screws which you can get from small hardware stores in US, but not the big box home stores in US).
- Want it to be sturdy and not unnecessarily vibrate or bend, so don’t go too thin. My design is 6mm thick and has vertical support rails to provide rigidity.
- Want the paste tip mount to be adjustable to allow paste tip to be positioned properly (related: see #4 below for more details on offsetting print head).
- Want mount to be super adjustable so it can be positioned out of the way while using the filament extruder, so it can be mounted on printer even using filament extruder.
- Want options in clamping the paste plastic tubing or paste tips to the mount while allowing fine control of the paste tip height from the print bed. Just like filament, I’m anticipating the paste tip’s distance from the bed will be critical for a good print.
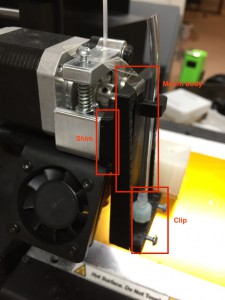
My mount consists of three 3D printed pieces:
- Mount body – the major body of the mount that screws to the Printrbot using existing screw holes and longer M3 metric screws. Required by both the Metal Plus and Metal Simple.
- Clip – this piece is screwed to the mount body using 6-32 x 1/2″ machine screws. The clip is what clamps the paste extruder tube or paste tip to the mount body, allowing it to be held firmly in place. It takes some force, but you can drive the 6-32 screws through the clip and into the mount body. The screws will carve threads into the mount body screw holes. You may want to use a drill or screw gun to drive these screws. Required by both the Metal Plus and Metal Simple.
- Shim – this shim has oversized holes and is positioned between the Metal Simple’s extruder and the mount body. The 6-32 screws are inserted through the oversized holes. This shim is mounted between the extruder and the mount body. This shim allows the mount body to be positioned properly due to the design of the Metal Simple’s horizontal extruder plate. Only required/used with the Metal Simple.
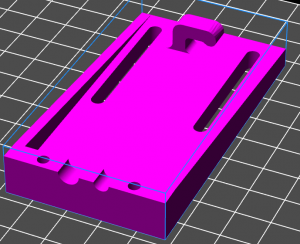
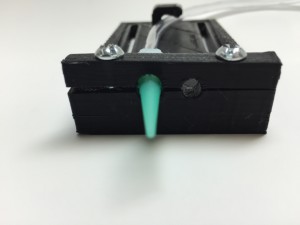
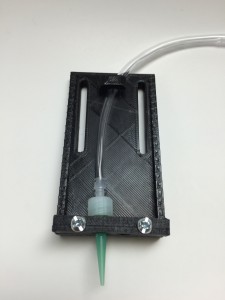
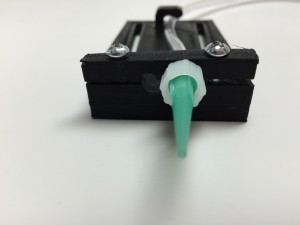
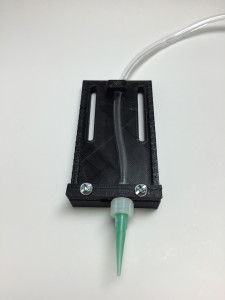
To allow for maximum flexibility/options for mounting the paste tip. The mount has two different size holes to allow flexibility in clamping the tip or the hose/connector. The larger hole (on left of mount body) works well for clamping the extruder tips and the smaller hole (on right of mount body) work well for clamping the hose where the male connector fits into the tube (this is just above the tip). Here are the 3D models for the mount body:
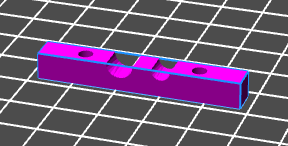
The 3D model for the clip:
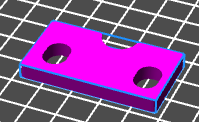
And the 3D model for the shim:
Here are photos of the printed mount pieces and illustrates how they screw together and fit with the extruder tips (on left mount hole) and hose (on right mount hole). On my Printrbot Plus Metal, using Simplify3D v2.2, I used a .2mm layer height, 4 solid layers for the top/bottom and side shells, 25% infill, 210 degrees Celsius using Printrbot PLA filament (at high-end for temp for PLA to get a good bond between layers), and support enabled for mount body as I printed on its side for vertical layer “grain”. The clip and shim were printed flat on print bed without support:
Here is a photo of the shim installed on the Printrbot Simple Metal, you can see how it lines up with the M3 holes that mount the extruder:
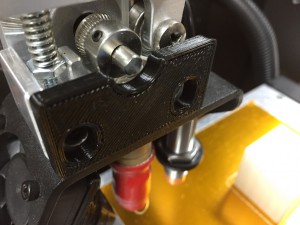
And here are all 3 pieces of the paste mount “installed” (yes, for this picture the mount is actually taped on the printer, it was an early pictures before I mounted it using M3 screws…kinda embarrassing) on a Printrbot Metal Simple. Click to enlarge the pictures to see better. Note that the shim is not necessary when mounting on a Printrbot Metal Plus:
3. Hook up the tubing: Most of the hard stuff is done, now hook up tubing from the extruder to the paste tip. Structur3D recommends the following sequence:
- Fill syringe: Fill the syringe with your paste material, insert the plunger and remove the air. You can use a small paperclip to break the seal of the plunger while applying slight pressure on the plunger to remove some air bubbles. Air in your syringe or tubing will result in lack of print material and will have a negative effect on your print.
- Attach hose: Attach a female connector to the syringe and push the tubing onto the connector. On the other side (closer to the printer), attach a male connector and screw the desired tip onto the connector. Finally, attach the hose to the syringe by screwing the syringe into the female connector.
- Purge the air from the line: Push on the plunger of the syringe to force paste into the tube and until it is extruding from the print tip.
- Mount the paste extruder tip: Secure the paste extruder tip to your paste mount on your 3D printer and secure the hose so it will not get in the way or drag in your print.
4. Adjust Z height: Again, given my goal to use my Printrbot to print both filament and paste, I’m planning to use one Z height offset to use while filament printing and second Z height offset to use while printing paste. Printrbot has documented the process (see steps 7-12) to use the M212 and M500 gcode commands to adjust the offset for your printer gantry/print head. Use M501 to find out your existing M212 Z value and write it in safe place. Then using Printrbot tutorial linked above, determine the M212 Z offset to raise the filament head about 1/2″ from print bed. Write down this second M212 Z value.
This is a the areas I’m still refining, but my plan is as follows: I want my filament extruder tip to be at its appropriate height while printing plastic filament. While printing plastic filament, my paste extruder mount will be removed from my printer or will be adjusted up so it is a 1/2 inch or so higher than the filament extruder tip. This will keep the paste extruder tip out of the way while printing plastic filament.
Prior to printing paste, I will do a few things:
- Enter M3o2 gcode (this is temporary override and must be done each time the printer is power cycled) to disable the Printrboard’s cold extrusion safeguard. This will allow me to have my filament extruder unheated while printing paste and avoid the alternative, which is to update my Printrboard’s firmware to permanently disable the cold extrusion safeguard.
- Enter M92 gcode to adjust the E (extruder) steps per millimeter to be about 35000(followed by M500 to save settings) , although this is definitely a value that needs to be monitored and adjusted by the community as we get more prints done using the Structur3D Discov3ry paste extruder on Printrbot machines. Given conversations with the good folks atStructur3D, I believe 35000 is a good starting point. Note that you will need to know your original M92 E value prior to adjusting to your paste settings so you can change it back to the appropriate setting for filament printing. You can see your current M92 setting by issuing the M501 gcode command. Here are the M92 recommended settings from Printrbot in the event that somehow forget your initial value.
- Enter the appropriate M212 gcode Z offset (followed by M500 to save settings) to bring my filament extruder tip 1/2 inch or so higher than where it is positioned to print plastic, which will ensure it is out of the way for paste printing. This will allow my paste extruder tip to be positioned lower to the bed (remember, the paste tip mount allows the tip to be raised or lowered) than the filament extruder tip while printing paste. Note that you will need to know your original M212 value prior to adjusting to your paste settings so you can change it back to the appropriate setting for filament printing. Your appropriate M212 Z offset is highly dependent on your machine and the position of your Z sensor. Use the M501 gcode to see your Z offset settings prior to making any adjustments.
- Adjust the paste mount: I’m anticipating the most difficult part of paste printing will be that the M212 offset is not put into effect until a print is started, so I will have to start my paste print with my paste extruder tip mounted about even with the filament extruder tip. I will use a skirt on all paste prints, and just as the skirt is starting to print (into the air!), I will pause the the print, wipe any paste from the tip and print bed, lower my paste extruder’s tip height toward the bed to be appropriate (width of a business card from tip to print bed?), then continue my print.
That’s all there is to it!
I will provide updates as I get printing different pastes. I think Nutella will be my first paste material to print. Pure silicone will likely be the second paste I experiment with!
Please post comments if you have any different or additional experiences to share!
hi, thank you for the explanation
i just received the Discov3ry Paste Extruder to install on my Printrbot simple.
in step number (4. Adjust Z height:) the link to Printrbot documentation redirect to a (No Results Found)
can you do a step by step video OR pictures for the steps above because I’m having trouble following the steps.
thanks in advance.
Thanks for letting me know that the link is no longer valid. I will try to put together a more detailed explanation. In the meantime, here is Brook Drumm from Printrbot explaining the process of adjusting z height in a video. https://www.youtube.com/watch?v=jpmgI4OGldw
Regards,
Matt