If you were lucky enough to get your hands on one of the first versions of the Printrbot Metal Plus printers, model 1504, you are probably a very happy person.
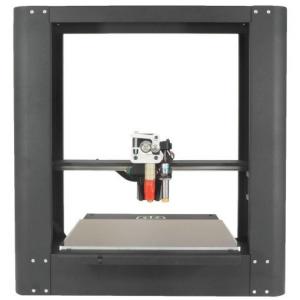
These printers are such a huge improvement from the previous wooden Printrbot Plus versions given their rigidity from the metal frame and experiencing-altering upgrades such as an auto-leveling bed. But, if you have one of these Printrbot Metal Plus printers, there are three modifications that are critical. If you bought your printer in June 2015 or later, these modifications should already be included in your kit or built Printrbot Metal Plus. If you bought your bot prior to June 2015, you should definitely check and order these (some free) upgrades from Printrbot if you don’t have them on your machine! Note that the first two upgrades are specific to the Printrbot Metal Plus, but the third (extruder) upgrade is something that anyone with a metal Printrbot printer (especially the Printrbot Metal Simple) should be looking to do as an upgrade.
Here is a brief description of the three mods:
- Wire Relief for Printrbot Plus
What happens when you bend a copper wire over and over and over? It snaps and breaks! That is a fairly common issue with all 3D printers, that wires can break after enough repetitive bending. Wires need to be flexible and move somewhat as the extruder moves in multiple axes. The way to minimize or eliminate this threat of breaking wires is to have your wire bend over a longer length (less sharp angle) and not have a tight bend anywhere that is flexing.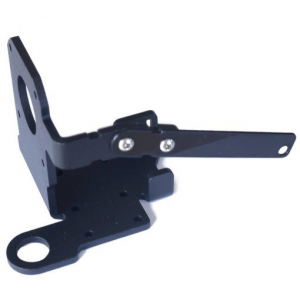 The free wire relief kit from Printrbot consists of a new bracket that holds your extruder/hot end, z sensor and extruder stepper motor. The kit is a bit time consuming to install as it requires dismantling your extruder completely. The most important part of the kit is a somewhat flexible plastic bracket that guides all wires at a 90 angle from the back of the extruder bracket, therefore eliminating any sharp angles that tend to put stress on you extruder wires. Note that a variation of this kit is already included in the Printrbot Metal Plus dual extruder upgrade kit and contains the flexible plastic bracket to ensure the optimal mounting of wires leaving the extruder bracket.
 - Spring and screw kit for Printrbot Plus
Initially, when the bed was heated on my Printrbot Plus Metal, I would hear and see the issue in my prints. The bed would make a crunchy noise as the bed moved along the Y axis (front and back). In the print, I would see the print drifted, meaning aspects of the print that were supposed to be vertical would be printed slanted in about a 45 degree angle. This was due to the fact that the bed would stick a bit and not move along the Y axis properly and was not positioned properly throughout the print and resulted in a slanted print. When the bed was cool, it was able to move along the Y axis (front and back) without any issue, resistance or abnormal sound. Once the aluminum bed was heated, the metal bed expanded the and bed no longer moved freely (without any resistance). When heated, the bed actually was expanding and would catch a bit in the track (on the left and right side) as the bed was pushing against the sides of the brackets and bearings. The original design has the brackets for the bed securely attached to the printer frame. The kit allows the bracket on the left side to move every so slightly when under pressure from the heated bed, therefore allowing the bracket to move slightly to accommodate the heated (expanded) and cooled (contracted) bed. The spring and screw kit (you may need to contact Printrbot support, support at printrbot.com, to get this part as I don’t see it listed on the Printrbot website any longer) consists of 4 longer screws and 4 springs. The spring and screw kit replaces 4 short screws (that connect the bracket to the frame) with longer screws along with a sprint for each longer screw. The springs are strong enough to provide a lot of pressure to hold the bracket firm. However, when the bed expands and pushes against the bracket, the bracket can move a tiny bit as the springs have it secured with a bit of wiggle room possible when the right force is applied. And when the bed cools, the bracket is pulled in a bit. Below is a picture to illustrate the point. In this first sketch, you can see the initial flawed design where the bracket was securely connected to the frame and is not able to move at all with the two screws tightened snug: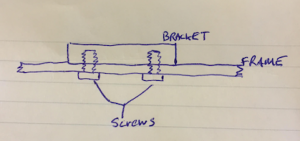
In this second sketch you can see the fix when the free spring and screw kit is installed. Longer screws are tightened against springs, which still keeps the bracket tight, but allows for a slight bit of movement given the slightly oversized holes in the frame, which allows for enough movement to accommodate the build plate’s expansion and contraction: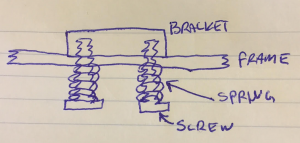 The fix only took about 30 minute to install. Most of the time was removing the many screws to take the bottom off the Printrbot Plus Metal. And the repair kit completely fixed the Y axis drifting issue. BTW, this is just an issue for Printrbot Plus Metal printers that were shipped through spring of 2015. New Printrbot Plus Metals that are shipping today already incorporate the spring and screw kit.
 - Printrbot Alu Extruder V2
Printrbot upgraded their aluminum extruder (Printrbot Alu Extruder V2) to shorten the distance from the direct drive extruder filament gear to the hot end. And to eliminate unnecessary space surrounding the drive gear. Why? To allow more flexible filaments to work properly in your printer. PLA is rigid enough that it works in just about any printer. ABS is a bit more flexible, but most printers will also work with ABS as they have been tested or were modified to use the PTFE or metal tubing “extruder straw” technique. However, as you move to even more flexible filaments such as NinjaFlex filament, you need to have an extruder that is setup for such flexible filaments. Extruders, such as the Printrbot Alu Extruder V1, have too much room between the filament drive gear (that makes your filament move into your extruder) and the top of extruder. As the filament is pushed down into the extruder, the heat from the extruder makes the filament even more flexible and it will get pushed into a tangled pretzel instead of being pushed into the extruder. With this upgraded extruder, the distance from the filament drive gear and the top of the hot end are made as short as possible and does not allow the filament to get tangled.This is a pictures of the Printrbot V1 aluminum extruder, note the large distance between the drive gear to the metal path to the hot end indicated by a red rectangle. Also note the space under and around the drive gear, where filament can get tangled: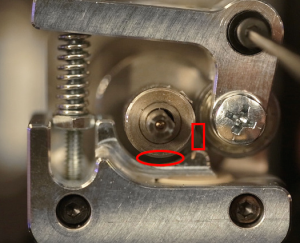 Below is a picture of the Printrbot V2 aluminum extruder, note the short distance from the drive gear to the metal path to the hot end and no space around and under the drive gear:
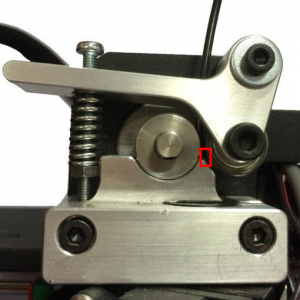
There are workarounds to print flexible materials, mostly in the form of guides that provide some rigidity to the filament after leaving the drive gear, but none of them are as reliable as upgrading to this V2 extruder.One fun fact, there is a special version of the V2 extruder that has a shorter top aluminum arm. You can see the spring arm (where you press with your thumb to release the spring and load or unload your filament) is longer on the v2 extruder. I would assume that is longer so it is easier to press the lever on the V2. However, if you have a dual extruder setup, you need to order the special V2 extruder that has a shorter arm so it does not interfere with the tighter dual extruder setup.
Leave a Reply